


TEYUN A6
Professional Audio Mixer with Bluetooth Record 6 Channels Input Mic Line Insert Stereo USB Playback USB Interface and a Sound Card
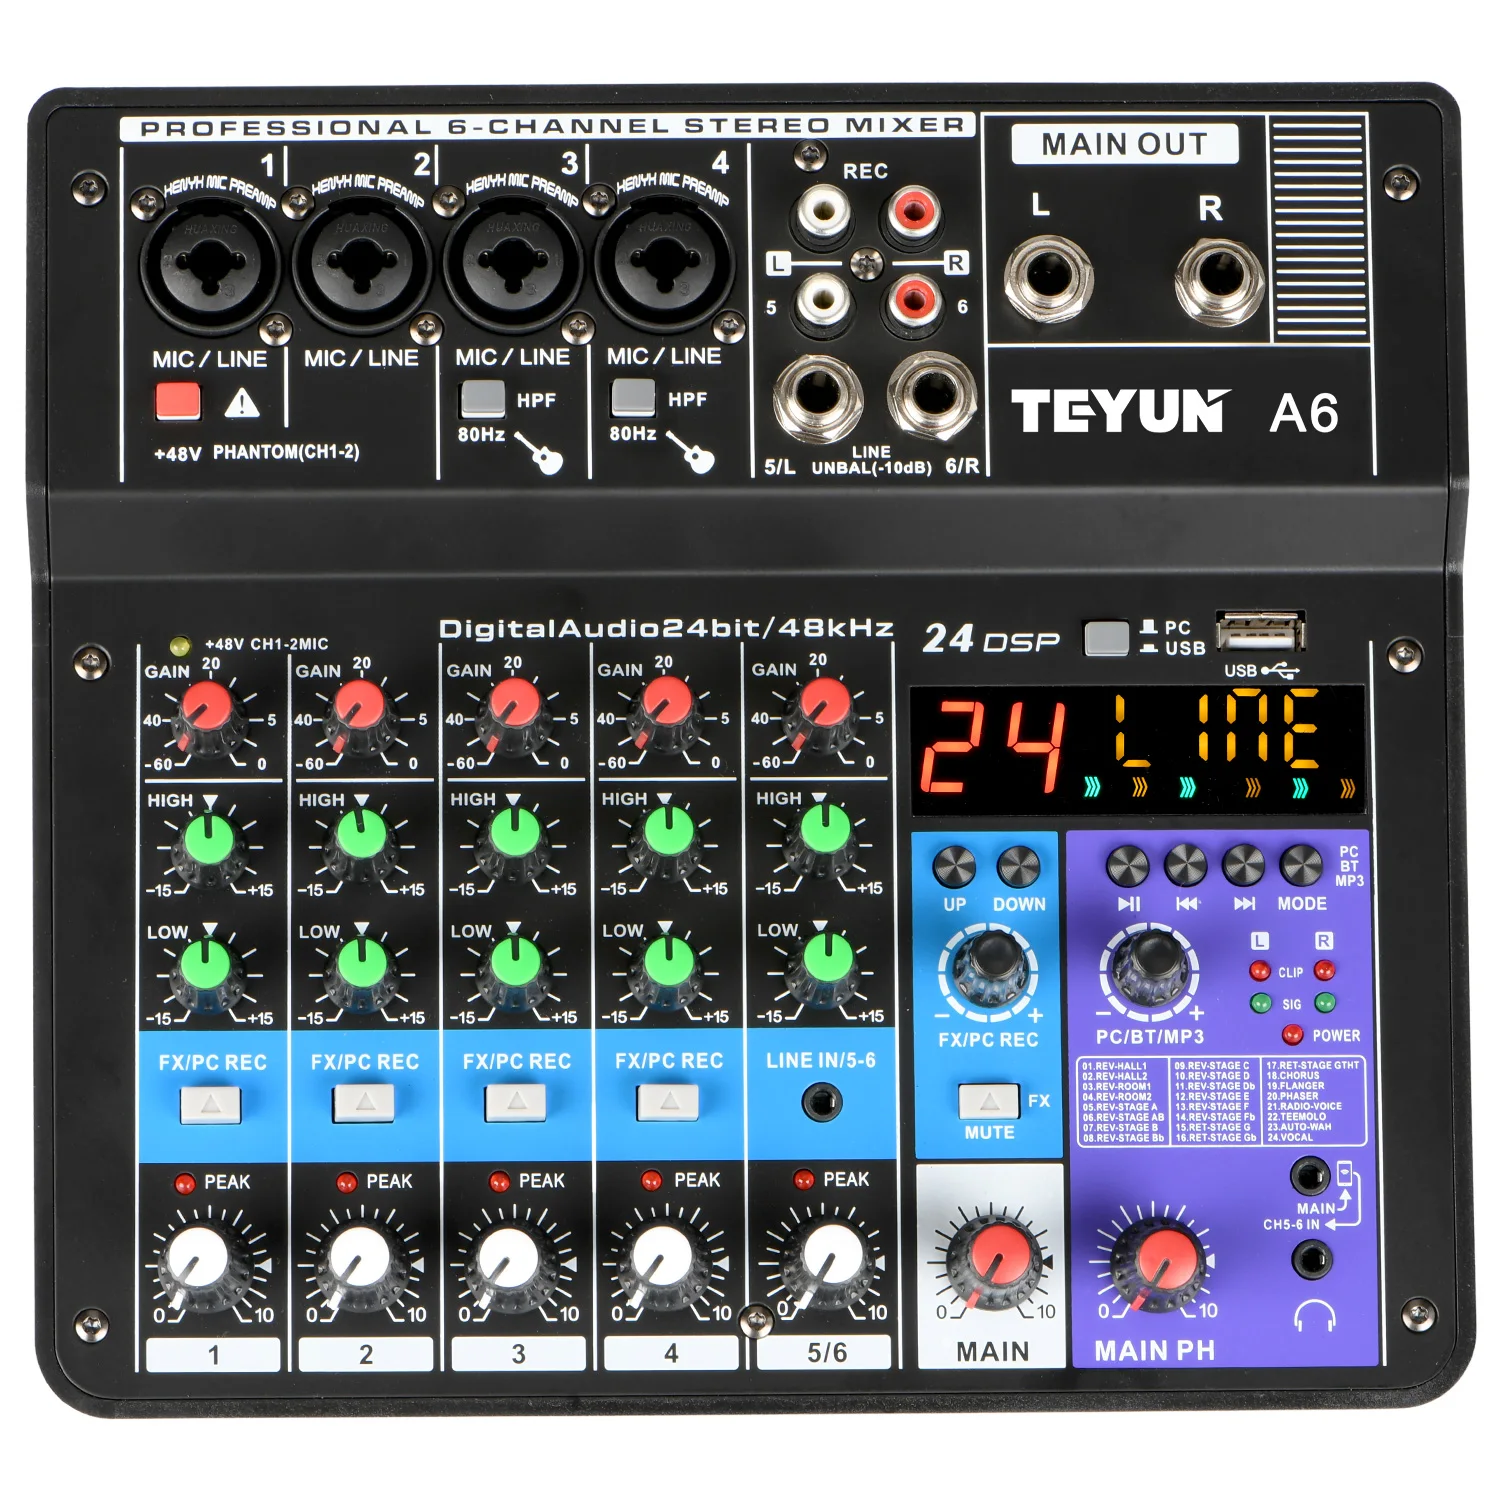
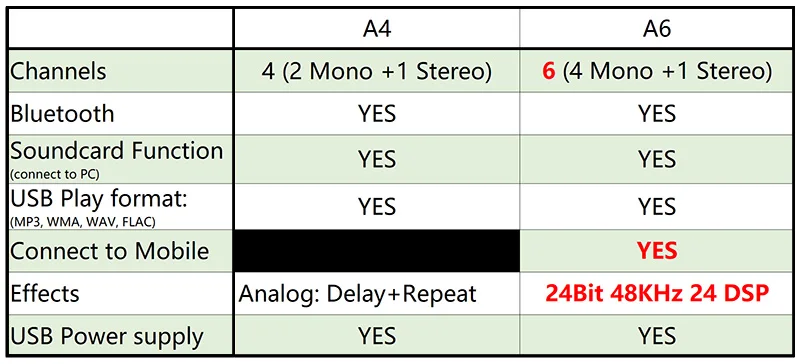
1. 6 Channels ( 4 mono +1 stereo)
2. USB power supply: 5V DC
3. Bluetooth
4. Soundcard function ( Computer playback) : Connect to Computer Via USB Cable
5. Mobile broadcast (podcast) function:
6. USB Play and Record
7. 24DSP Effects
A4 VS A6

1.Power Supply
1) Working Power: 5V DC
A) Power adapter
B) Computer supply power
C) Power bank supply power

2) Power Supply Interfaces
A) Micro B: Press down the button to choose Micro B interface.
B) Type-B: Bounce up the button to choose Type-B interface
Please Note:
Micro B Interface: Only for power supply
Type-B Interface: Power supply+Data transmission

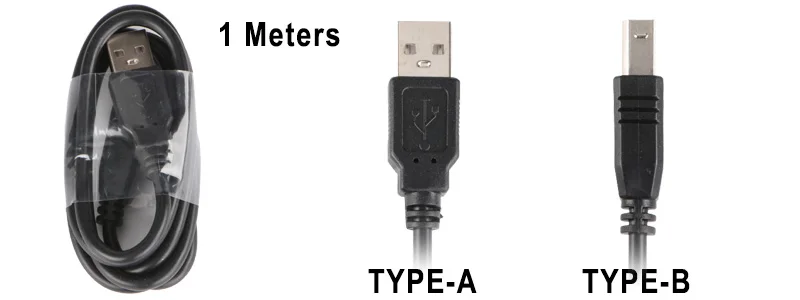
3)USB Cable:1 Meter (3.3 in)
2.Effect
Please Note:
The 24th effect is vocal. It is no orignal voice, there is no effect.

Adjustment of Effect
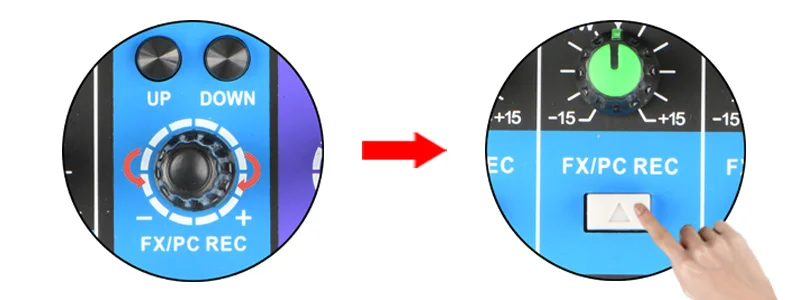
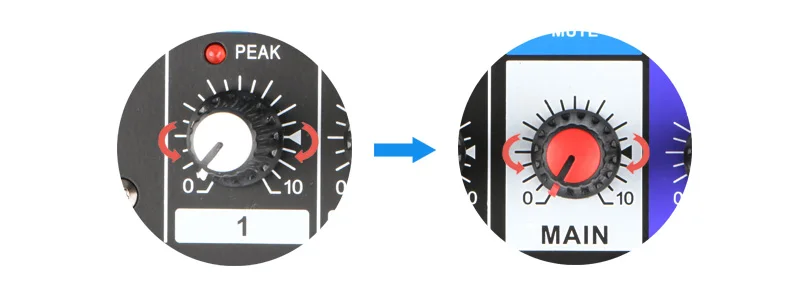
1) Adjust the effect volume output to channel:
Rotate the "FX/PC REC" knob to increase or reduce the effect volume
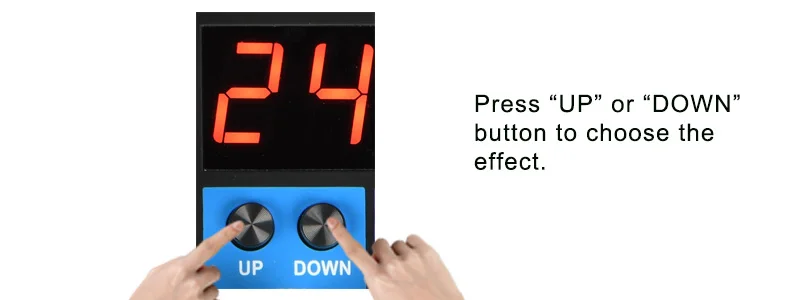
2) Press down the "FX/PC REC" button to allow the effect input to channel.
Bounce up the "FX/PC REC" button to cancel the effect input to channel.
3.Bluetooth

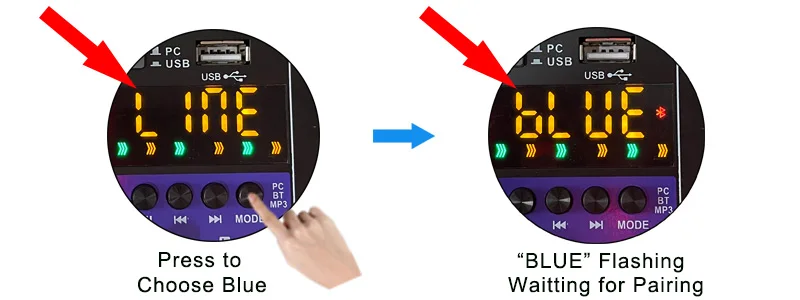
1) Waiting for Pairing:
Press MODE to "BLUE", "BLUE" is flashing, and waiting for the pairing.
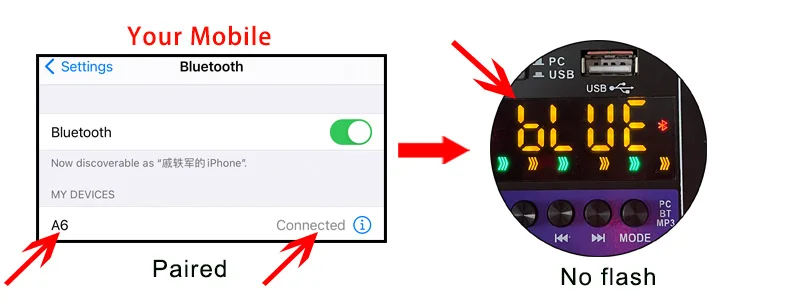
2) Bluetooth Connect:
A) Open your mobile bluetooth
B) Choose "A6"
C) Connected
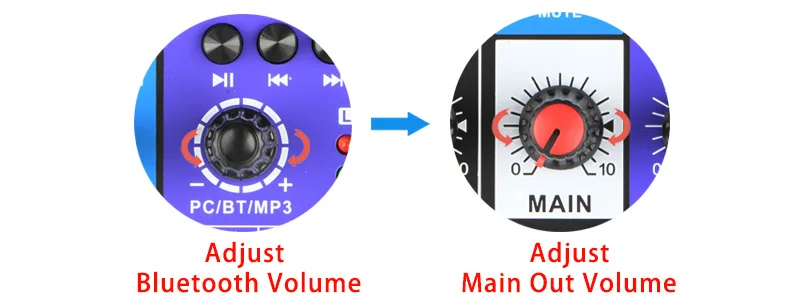
3) Bluetooth Volume Control:
A) Rotate the PC/BT/MP3 knob to increase or reduce the bluetooth volume
B) Rotate the MAIN knob to increase or reduce the main out volume
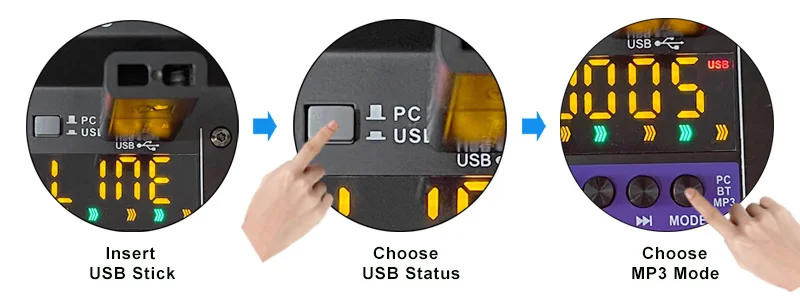
4.USB Play:
1) USB Play Format:
MP3, WAV,WMA,FLAC
2) USB Play:
A) Insert usb stick
B) Press to choose "USB"
C) Press MODE to choose "USB"
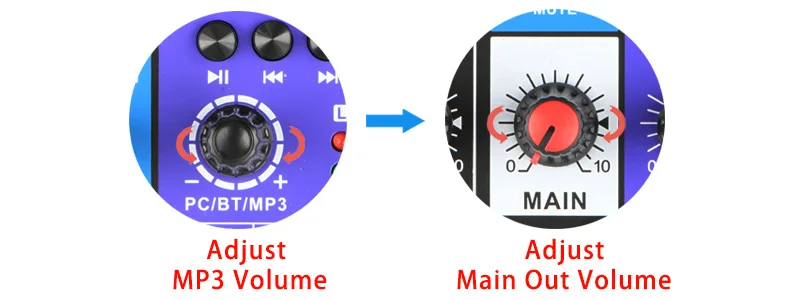
3) MP3 Volume Control:
A) Rotate the PC/BT/MP3 knob to increase or reduce the USB volume
B) Rotate the MAIN knob to increase or reduce the main out volume
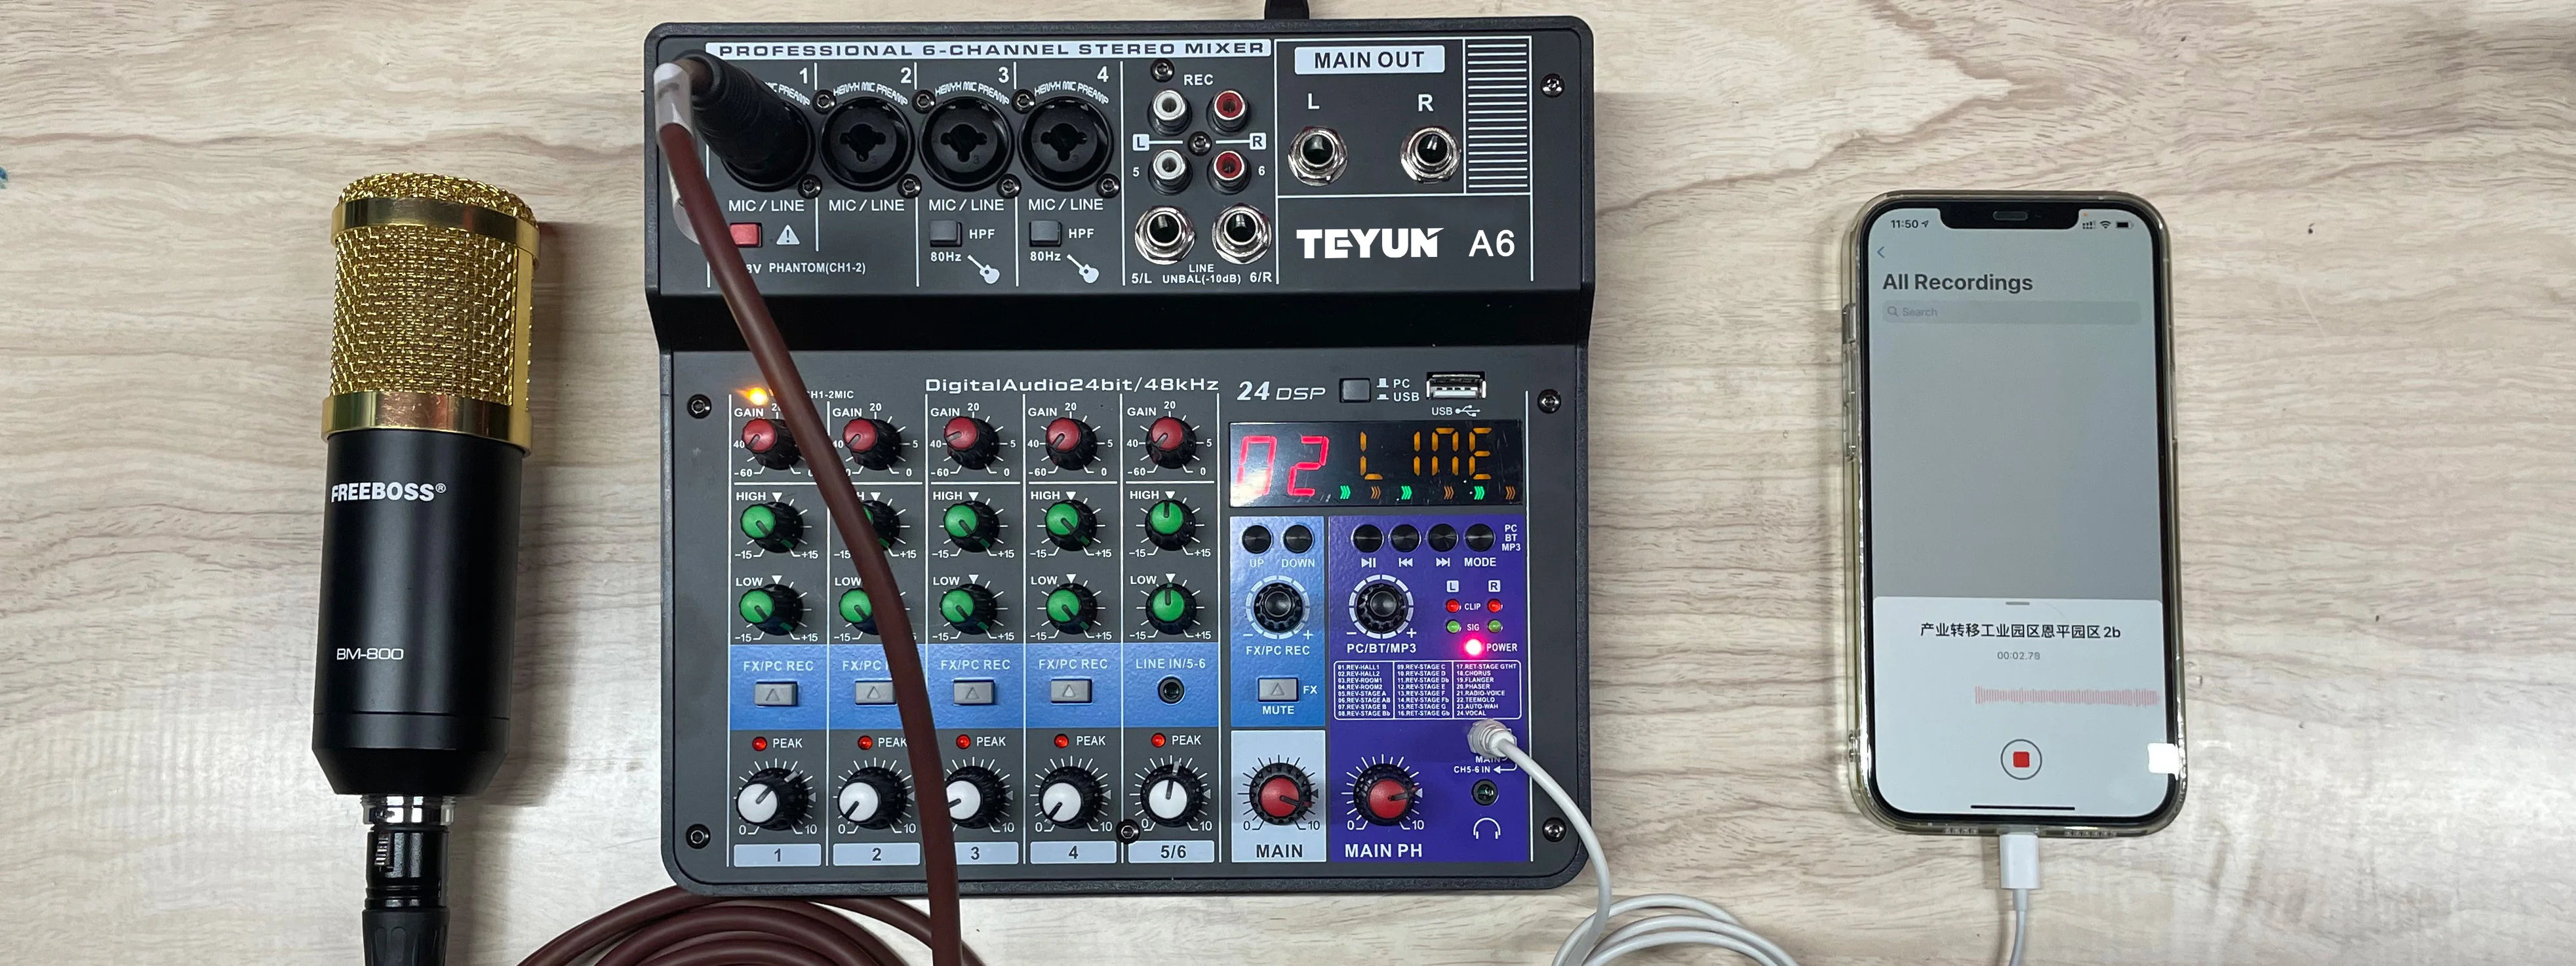
5.USB Recording
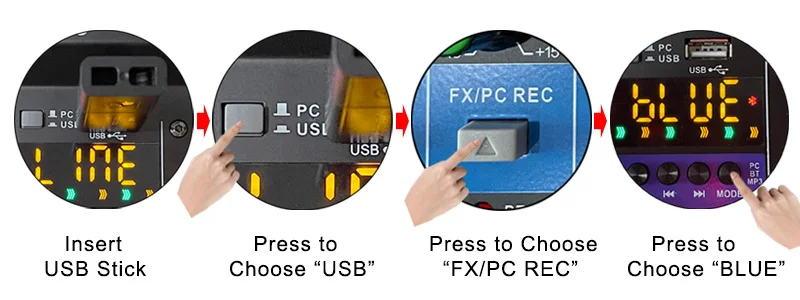
1) Prepare for The Record:
A) Insert USB stick
B) Press the button to USB status
C) Press down channel "FX/PC REC" button
D) Press MODE to choose "Blue" status
2) USB Record:
A) Long press "PLAY/PAUSE" to record, there will be a "REC" mark when you are recording.
B) Long press "PLAY/PAUSE" to end the record.

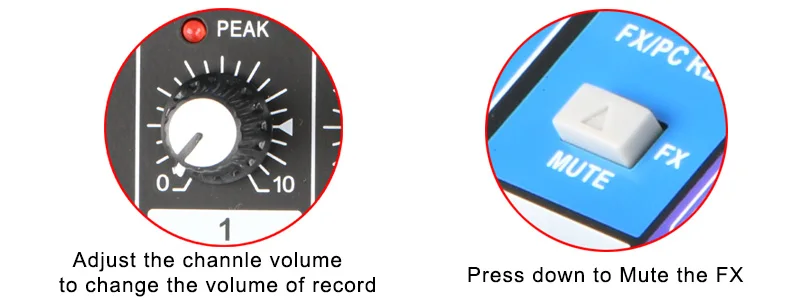
3) Adjustment of Recording Volume:
A) Adjust the input channel volume to increase or reduce the record volume.
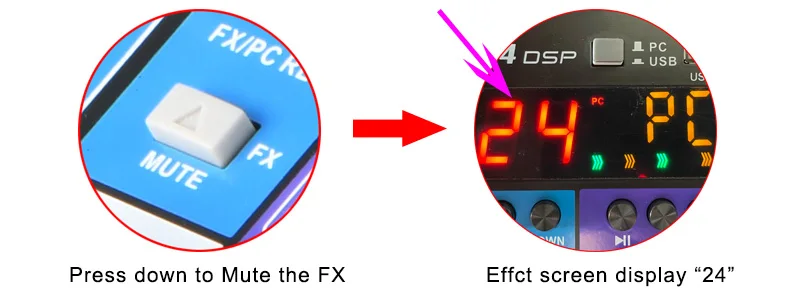
B) Mute effect :
When you record, if you do not need the effect, please press down the "MUTE FX" button to mute FX
After you press down the mute button, the effect will go to 24. it is no effect.
4) Turn Off the Effects:
If you do not need effect, please press "FX MUTE" button to MUTE the effect.
After you press down the mute button, the effect will go to 24. it is no effect.

5) Play the Record File:
A) Press MODE to USB status
B) Press Pre-button to the last song. it is the record file.then it will play automatically.

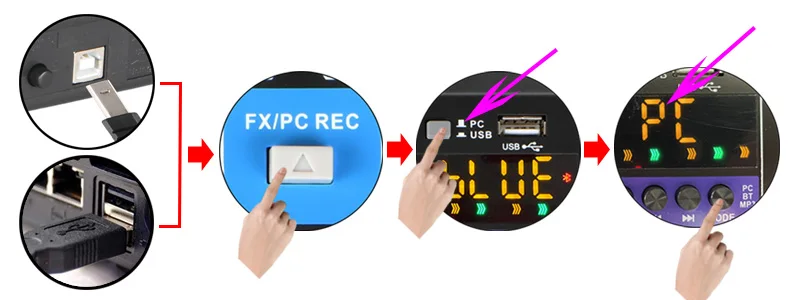
6.Connect to the Computer
1) Soundcard Function of the Mixer:
A) This model had soundcard function.
B) You can connect audio mixer to computer via USB cable .
C) When connected, audio mixer signal can be transmitted to computer, computer signal can be transmitted to audio mixer.

2) Connect Audio Mixer to Computer:
A) Connect audio mixer to computer via the USB cable.
B) Press down the FX/PC REC button of the channel.
C) Bounce up the button to choose PC status.
D) Press the MODE to choose PC status.
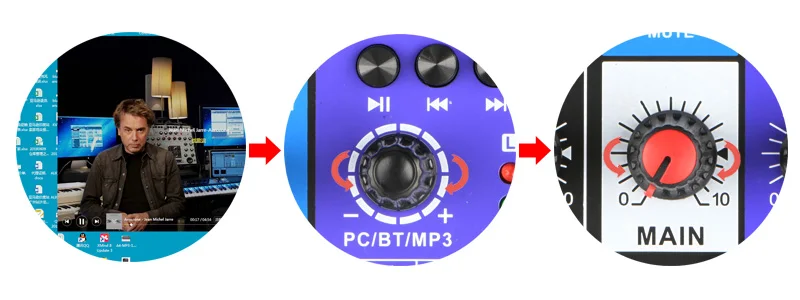
3) Play Music from Computer
A) Open music play program of computer, and play music
B) Rotate the PC/BT/MP3 knob to increase or reduce the volume from computer to audio mixer
C) Rotate the MAIN knob to increase or reduce the volume to Main out.
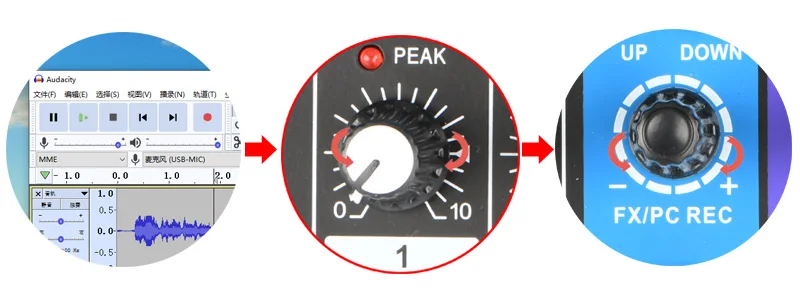
4)Record from Computer
A) Open your computer record program
B) Choose audio mixer as the microphone and speaker.
C) Rotate the channel volume knob and FX/PC REC knob to adjust the volume of the record.
5)Turn Off the Effects:
If you do not need effect, please press "FX MUTE" button to MUTE the effect.
After you press down the mute button, the effect will go to 24. it is no effect.
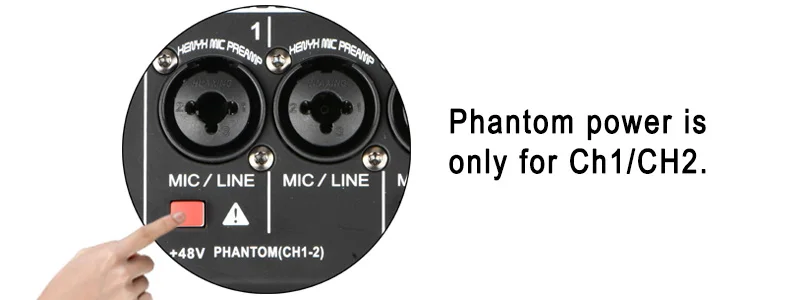
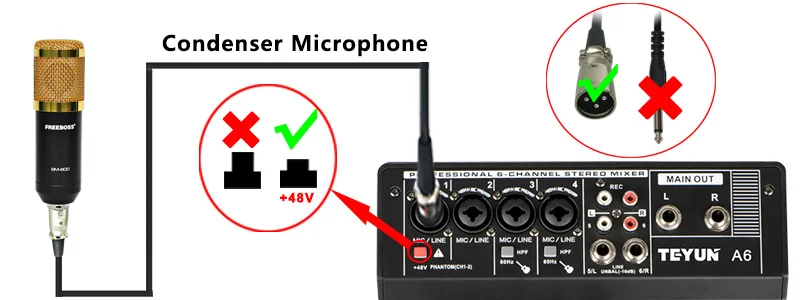
7.+48V Phantom Power:
1) For this model, there is only one +48V phantom power switch.
2) +48V Phantom power is only for XLR, not for 6.3.
3) The phantom is only for CH1 and CH2 XLR socket.
4) When you turn on the +48V phantom power, CH1 and CH2 XLR input sockets will supply the +48V phantom power.
Dynamic Microphone and +48V Phantom Power:
When you use dynamic microphone, please do not turn on the +48V phantom, otherwise the dynamic microphone maybe burnt.

Condenser Microphone and +48V Phantom Power:
A) Please sure if your condenser microphone support +48V phantom power.
(Note: Some condenser microphone does not support +48V phantom power).
B) Power on +48V phantom power to supply the power to condenser microphone.
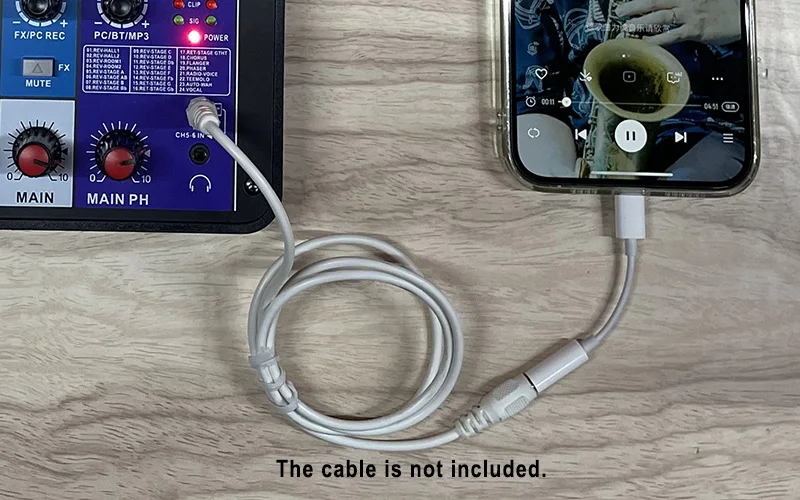
8. Mobile broadcast (podcast) function (Connect audio mixer to mobile):
1) You can connect mobile to audio mixer through TRRS socket.
2) Audio mixer can transmit the signal to mobile——Such as mobile recording, live broadcast
3) Mobile can transmit the signal to audio mixer— Such as music play

Cable:
The cable is only for display, it is not included in the package. You need buy the cable by yourself.
Music Volume Control
If you want to adjust the volume, when you play mobile music to audio mixer
1) Adjust the output volume of mobile.
2) Adjust the volume of audio mixer:
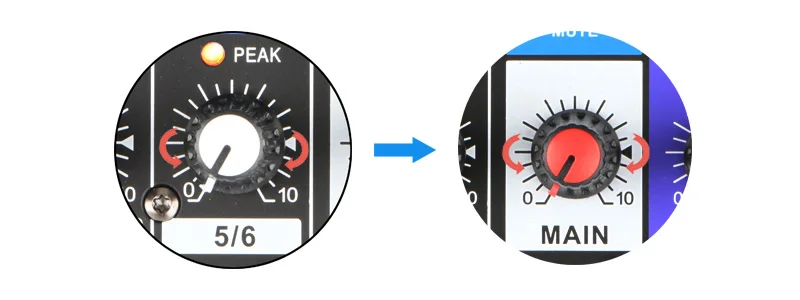
A) Rotate CH5/6 volume knob to adjust the volume
B) Rotate MAIN volume knob to adjust the volume
Mobile Record Connection
1) Connect microphone to audio mixer channel 1.
2) Connect mobile to audio mixer via TRRS socket.
3) Mobile record volume adjust:
A) Adjust the volume of input channel volume
B) Adjsut the volume of the main out volume
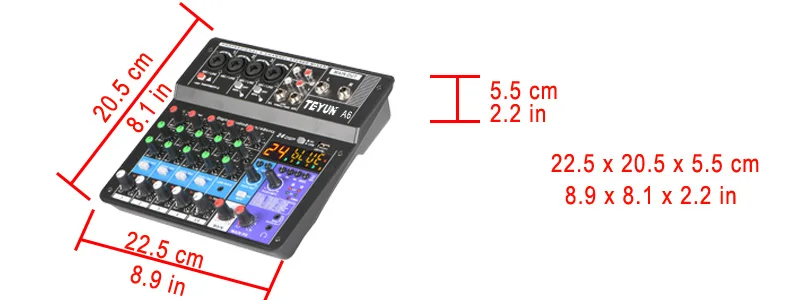
9.Mixer Size and Packing List:

Only logged in customers who have purchased this product may leave a review.
Welcome to Chokhdi.com! We\'re thrilled to have you join our vibrant community of vendors. Here\'s everything you need to know about shipping your products:
1. Shipping Timelines:
2. Shipping Methods:
3. Shipping Rates:
4. International Shipping:
5. Order Packaging:
6. Communication with Customers:
7. Returns and Exchanges:
8. Compliance:
9. Updates to Policy:
Thank you for being part of the Chokhdi.com community. If you have any questions or need assistance, please don\'t hesitate to contact us. Happy selling!
Welcome to Chokhdi.com! We\'re excited to have you as part of our growing network of vendors. Here\'s our policy on refunds:
1. Refund Eligibility:
2. Initiating a Refund:
3. Return Process:
4. Refund Processing Time:
5. Partial Refunds:
6. Non-Refundable Items:
7. Communication with Customers:
8. Compliance:
9. Updates to Policy:
Thank you for your cooperation in upholding our refund standards. If you have any questions or need assistance, please feel free to reach out. We\'re here to support you in providing excellent customer service.
Cancellation/Return/Exchange Policy for Chokhdi.com
Welcome to Chokhdi.com! As a vendor on our platform, it\'s important to understand our policies regarding order cancellations, returns, and exchanges. Here\'s what you need to know:
1. Order Cancellations:
2. Return Eligibility:
3. Return Process:
4. Exchange Policy:
5. Refund Processing:
6. Non-Returnable Items:
7. Communication with Customers:
8. Compliance:
9. Updates to Policy:
Thank you for your cooperation in upholding our policies. If you have any questions or need assistance, please feel free to reach out. We\'re here to support you in providing excellent customer service.
There are no inquiries yet.


Reviews
There are no reviews yet.